Assignment HOWTO
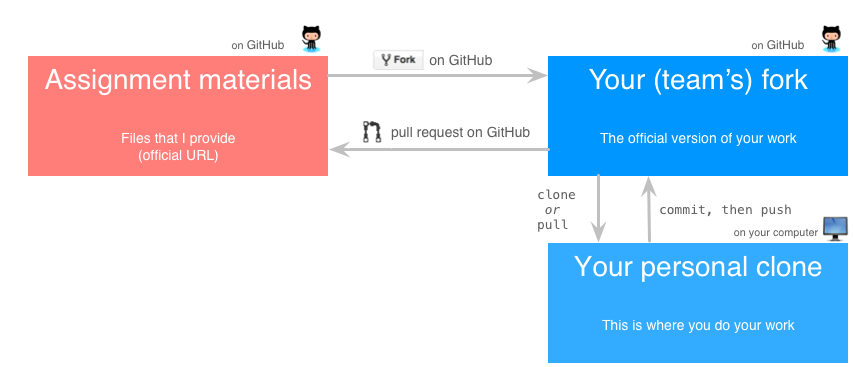
We’ll use GitHub as a submission and critique system. Here’s a diagram of the process (click to view in a separate window):
Note: These instructions will describe two ways of interacting with GitHub:
- Using Sourcetree, an application that makes it easy to work with GitHub. This is the preferred way to do things. See the Installing Sourcetree page for information on how to set up Sourcetree on your computer.
- Using the command line. If you want to go this route, I’ll assume you already know what you’re doing! :)
Get the assignment materials by forking the official repository
- Go to the assignment’s page on GitHub (we’ll call this
<official-url>). - At the top right of the page, click the Fork button to fork the repository to your account.
We’ll call the fork that lives on GitHub the GitHub fork. Think of it as the official version of your work. If it’s not on your GitHub account, it’s not official!
Clone your fork to your own machine
You’ll probably want to edit files on your own computer, rather than on GitHub. So, you’ll need to get the files from GitHub to your computer.
- On your fork’s GitHub page, click the
Clone or download button. - Click the text that says
Use HTTPS. - Click
Open in Desktop. Sourcetree should open aClone Newdialog box with some information filled out. - In
Destination Path, select the directory on your computer where you’d like your files to live. You may need to create a new directory. We’ll call this directory the local clone. - Click the
Clonebutton. - Sourcetree opens a new window with information about your local clone.
Using the command line, instead
On your own machine, in a directory that will contain your assignment, run:
git clone <fork-url>
Connect your local clone back to the official repository
This step lets you get updates to the original assignment, if necessary.
- In the Sourcetree window for your local clone, on the left-hand side of
the window, right-click
REMOTES. - Select
New Remote.... - In the pop-up box:
- For
Remote name, useupstream. - For
URL / path, use the<official-url>. - Click
OK.
- For
- Click
OKagain.
Using the command line, instead
In your local clone directory, run:
git remote add upstream <official-url>
Work on the assignment and commit back to the GitHub fork
Use your favorite text / code editor to work on your assignment.
While you’re working, be sure to commit often. Each time you do a reasonable piece of work (e.g,. answer a question or implement a small feature), perform a commit, like so:
- In the Sourcetree window for your local clone, on the left-hand side,
under
WORKSPACE, clickFile status. - You should see all the changes you’ve made your files.
- Check the box next to the files that you want to commit.
- At the bottom of the screen, click in the
Commit messagebox. - Write a commit message: a short, informative description of the change.
- Under the commit-message box, check the box that says
Push changes immediately to.... -
Click the
Commitbutton.Note: The first time you do this, you will probably need to enter your GitHub credentials. If your computer gives you an option to save your login information, you might want to, so that you don’t have to enter your GitHub username and password every time you commit/push.
Your changes are now saved on GitHub.
Using the command line, instead
This command will commit your changes to the local clone:
git commit -m 'an informative log message'
If you add a new file, you’ll need to add it to the repository:
git add <new file>
Eventually, you’ll need to push the changes from your local clone to your fork on GitHub:
git push
(Possibly) get updates from your teammate(s)
The version of your work that’s on Github might be different from the version in your local clone—for example, if you’re working on a team and your teammate pushes code to Github. In this case, you’ll want to always get the latest version of the work from Github before you modify your code. Here’s how:
- In the Sourcetree window for your local clone, at the top of the window,
click the
Pullbutton.
Using the command line, instead
To get updates from the GitHub fork to your local clone, run:
git pull
(Possibly) get changes to the official assignment
If the assignment changes after it comes out, you can get updates like so:
- First, make sure that your local clone is up-to-date with your fork on GitHub (by committing / pushing any changes).
- In the Sourcetree window for your local clone, on the left-hand side of
the window, under
REMOTES, right-click onupstream. SelectPull from upstream.... - For
Remote branch to pull, selectmaster. - Click
OK.
Your files should now contain updates from me.
Using the command line, instead
In your local clone directory, run:
git pull upstream master
You’ll then need to commit and push back to your GitHub fork.
Turn in your assignment by submitting a pull request
- On GitHub, go to the page for your repository.
- Click on the Pull Request button (it’s the green button with two arrows, right above the list of repository files).
- Important: Make sure you’re submitting from the correct repository to the correct repository.
- On the left-hand side, make sure it’s the master for the assignment’s repository.
- On the right-hand side, make sure it’s the master for your fork.
- Click “Create pull request”.
- Use your name(s) for the title of the pull request.
You can keep updating your fork after you submit a pull request. All future updates to your GitHub repository (e.g., via pushes) will be tracked by the pull request.
Peer-review other people’s work
Each assignment will have a portion devoted to critique. I’ll suggest some prompts that you can use to help you give good feedback to other people. To give feedback, comment on other people’s pull requests.